Ever wonder why your espresso at home doesn’t quite match up to that perfectly balanced, aromatic shot you get at your favorite coffee shop? The secret might just be the E61 group head. This piece of coffee engineering wizardry plays a pivotal role in brewing that perfect shot of espresso, making it a must-have for both professional baristas and serious home brewers.
The E61 group head is more than just a shiny piece of metal attached to your espresso machine. It’s a hallmark of espresso-making excellence with a rich history that dates back to its introduction in 1961 by Faema, an Italian company known for revolutionizing coffee machines. Since then, it has become a favorite among coffee enthusiasts for its consistency, durability, and the exceptional quality of espresso it helps produce. Let’s dive into the fascinating world of the E61 group head and discover how to use it to brew the perfect espresso.
What is the E61 Group Head?
The E61 group head made its grand debut in 1961, courtesy of the innovative minds at Faema, an Italian company that changed the espresso game forever. The “E” stands for “espresso,” and “61” marks the year of its creation. This design was groundbreaking at the time and has since become a standard in the world of espresso machines.
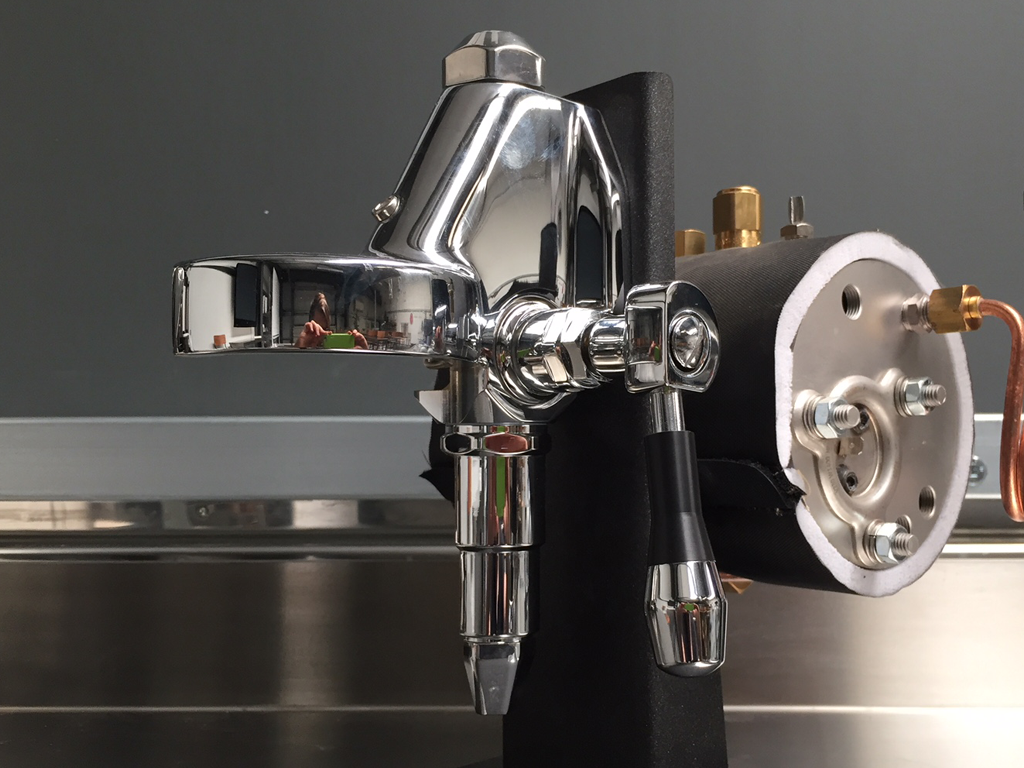
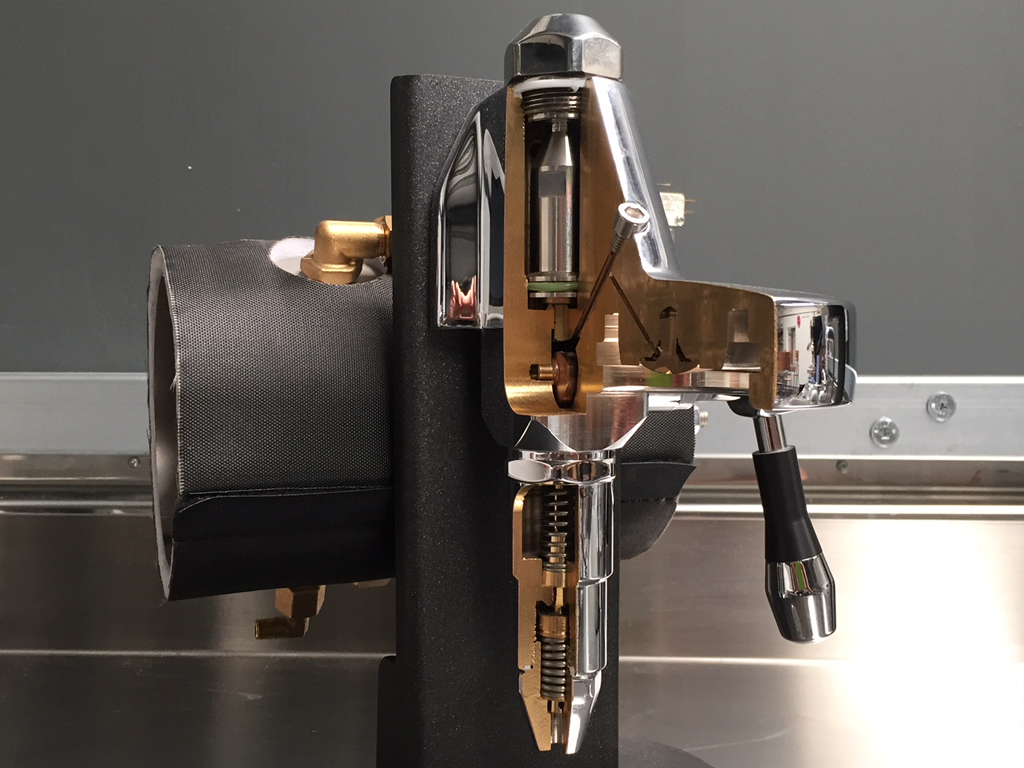
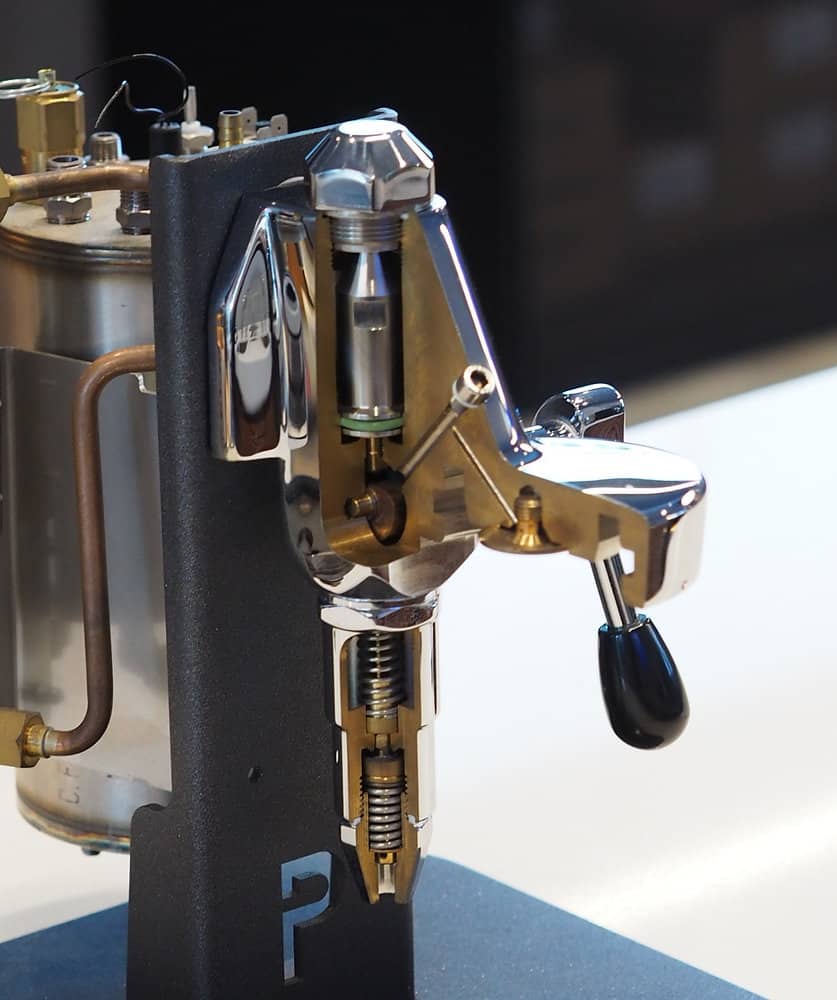
The brilliance of the E61 lies in its design and the key features it brought to the table. One of its standout innovations is the thermosyphon system, which continuously circulates hot water between the boiler and the group head. This ensures that the group head maintains a consistent temperature, which is crucial for brewing a great espresso shot.
Another notable feature is its brass construction. Brass is excellent for retaining heat, which again helps in maintaining the temperature stability necessary for consistent espresso extraction. Plus, it’s incredibly durable, which means your E61 group head can last for years with proper care.
The lever mechanism is another hallmark of the E61 design. This lever isn’t just for show—it allows for manual control over the pre-infusion process, letting water gently soak the coffee grounds before the full pressure is applied. This helps in extracting a richer, more nuanced flavor from the coffee.
Key Features
Temperature Stability: The thermosyphon system is a game-changer for temperature stability. By continuously circulating hot water, it ensures that the group head stays at a consistent temperature, which is vital for brewing an espresso that’s neither too bitter nor too sour. This stability means that every shot you pull will have the same excellent quality, assuming you maintain other variables like grind size and tamping pressure.
Pre-infusion Mechanism: The E61’s pre-infusion mechanism is all about enhancing flavor. During pre-infusion, a small amount of water is released to saturate the coffee grounds before the full brewing pressure kicks in. This gentle start allows the coffee to bloom and reduces the chances of channeling, where water finds a path of least resistance and doesn’t extract evenly. The result? A more balanced and flavorful espresso shot with a rich crema on top.

With its innovative design and key features, the E61 group head stands as a testament to timeless engineering that continues to delight coffee lovers around the world.
Reasons You Need to Know About the E61 Group Head
Let’s start with the basics: the E61 Group Head isn’t just a fancy gadget for show. It’s a pivotal player in ensuring that your espresso experience is nothing short of extraordinary. Here’s why you absolutely need to have the E61 on your radar:
- 1. Temperature Stability: The E61’s thermal magic ensures that your espresso brews at the perfect temperature consistently. Say goodbye to those uneven, lackluster shots!
- 2. Pre-Infusion Brilliance: It offers pre-infusion, gently wetting the coffee grounds before the full extraction. This results in a more even extraction and an explosion of flavors in your cup.
- 3. Timeless Design: The E61’s classic, elegant design isn’t just eye candy; it’s a statement piece in your kitchen that screams, “I take my coffee seriously!”
- 4. Durability: Built like a tank, this beast is designed to last. You’ll be pulling shots for years without missing a beat.
- 5. Espresso Artistry: With precise control over extraction, you can become a true espresso artist, experimenting with various beans and grind sizes to craft your perfect cup.
Credits to Lamarsa Coffee Machine Company
Step-by-Step Instructions to Master the E61 Group Head
Alright, my coffee-loving comrades, it’s time to roll up those sleeves and get our hands on the E61 Group Head. In this section, I’m going to guide you through the intricacies of using this espresso powerhouse step by step.
Preparing Your Equipment
Preheating your espresso machine, especially the E61 group head, is a crucial step in the brewing process. The E61 group head’s design relies heavily on maintaining a stable temperature to ensure optimal extraction. If the group head is too cold, it can absorb heat from the water, leading to under-extraction and a sour-tasting shot. Conversely, if it’s too hot, it can cause over-extraction, resulting in a bitter espresso. Therefore, getting the group head to the right temperature is essential for achieving that perfect balance in your espresso.
Steps to Properly Warm Up the Machine:
- Turn On the Machine: Start by turning on your espresso machine and letting it reach its operating temperature. This typically takes about 15-20 minutes, but refer to your machine’s manual for specific warm-up times.
- Run Water Through the Group Head: Once the machine is warmed up, run a few ounces of water through the group head. This helps to bring the group head to the correct temperature more quickly by allowing the hot water to circulate through the thermosyphon system.
- Heat Your Portafilter and Cups: While the machine is warming up, place your portafilter and cups on top of the machine. Most machines have a warming tray on top that uses residual heat from the boiler. This step ensures that your portafilter and cups are warm, which helps maintain the temperature of the espresso as it brews and is served.
Purge the Group Head
Why It’s Important:
Purging the group head is an essential step that helps ensure your espresso machine is clean and ready for brewing. It removes any stale water that has been sitting in the group head, which can affect the taste of your espresso. Additionally, purging helps clear out any coffee grounds or oils that might be lingering from previous shots, ensuring a fresh and clean extraction every time.
How to Do It:
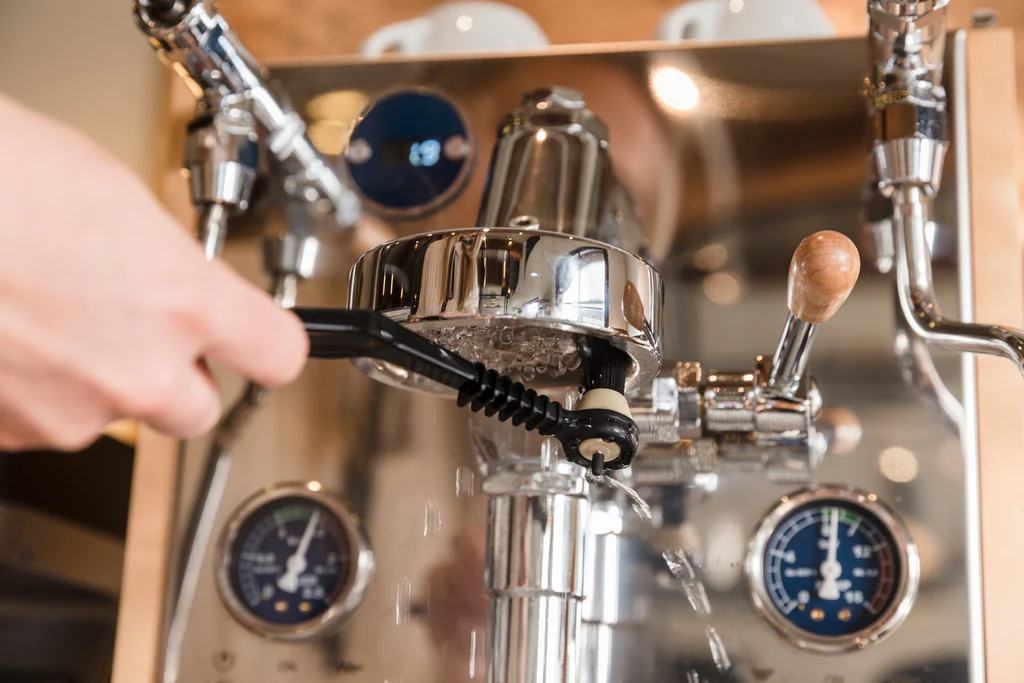
- Place an Empty Portafilter in the Group Head: Insert the empty portafilter into the group head and lock it in place as if you were preparing to brew a shot.
- Run Water Through the Group Head: Activate the brew cycle for a few seconds, allowing hot water to flow through the group head and into the drip tray. This flushes out any old water and residue.
- Remove and Inspect: Remove the portafilter and inspect it to ensure it’s clean. If there are any remaining coffee grounds or oils, rinse it thoroughly before proceeding.
The Brewing Process
Selecting the Right Grind Size:
The grind size is one of the most critical factors in brewing a great espresso. For the E61 group head, you’ll want a fine grind, similar to the texture of table salt. Too coarse, and the water will pass through too quickly, resulting in under-extraction and a weak, sour shot. Too fine, and the water will struggle to pass through, leading to over-extraction and a bitter, harsh espresso.
Proper Dosing and Tamping Techniques:
- Dosing: Measure out the right amount of coffee for your portafilter. A standard double shot typically requires 18-20 grams of coffee. Use a digital scale for accuracy.
- Distribution: After dosing, ensure the coffee grounds are evenly distributed in the portafilter. You can use a distribution tool or simply tap the portafilter gently on the counter.
- Tamping: Apply firm and even pressure to the coffee grounds using a tamper. Aim for about 30 pounds of pressure, ensuring the coffee bed is level and compact. A good tamp helps create even resistance for the water, promoting uniform extraction.
Extraction
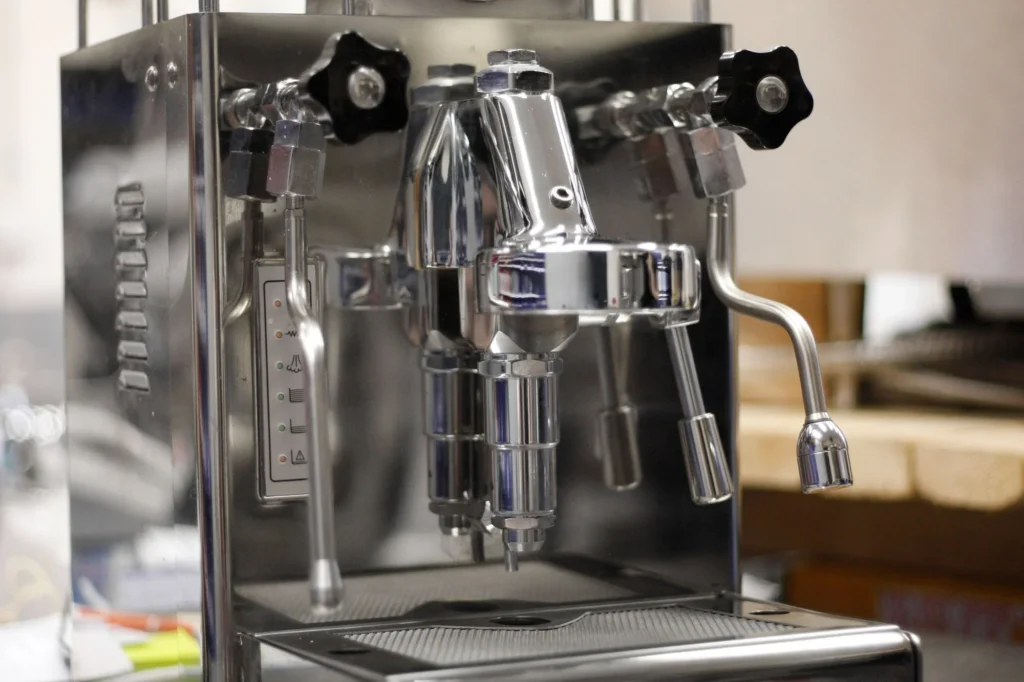
Locking in the Portafilter:
Insert the portafilter into the E61 group head and lock it in place by turning it to the right until it’s snug. Make sure it’s secure but don’t over-tighten it.
Initiating Pre-infusion and Full Extraction:
- Pre-infusion: Start the brewing process by lifting the lever or activating the brew switch to initiate pre-infusion. Water will gently start to wet the coffee puck, allowing it to expand and eliminating any dry spots. Pre-infusion typically lasts around 5-10 seconds.
- Full Extraction: After pre-infusion, continue lifting the lever or keep the brew switch on to allow full pressure to build. Water should flow through the coffee puck at a steady rate. The entire extraction process for a double shot should take about 25-30 seconds, yielding 1.5 to 2 ounces of espresso.
Tips for Monitoring and Adjusting the Extraction Process:
- Flow Rate: Keep an eye on the flow of espresso. It should start as a slow drip and then turn into a steady stream, resembling warm honey. If the flow is too fast, the grind may be too coarse or the dose too low. If it’s too slow, the grind may be too fine or the dose too high.
- Color and Texture: The color of the espresso should transition from a deep brown to a lighter, golden color as the extraction progresses. The crema on top should be thick and consistent, indicating a good extraction.
- Taste Test: Ultimately, the best gauge of a good extraction is taste. A well-extracted shot will be balanced, with a harmonious blend of sweetness, acidity, and bitterness. If it tastes off, adjust your grind size, dose, and tamping pressure accordingly.
Serving and Cleaning
Importance of Serving Immediately in a Pre-warmed Cup:
Once your espresso is extracted, it’s crucial to serve it immediately to preserve its optimal flavor and aroma. Espresso has a short window where it tastes its best, so don’t let it sit too long. Serve it in a pre-warmed cup to maintain its temperature, which helps in enhancing the overall experience. A warm cup ensures that the espresso doesn’t cool too quickly, keeping the crema intact and the flavors balanced.
Cleaning and Maintenance
Regular Cleaning Routines:
- Daily Cleaning:
- Backflushing: Use a blind filter (a portafilter basket with no holes) and run water through the group head to clean out any coffee oils and residues. Do this at the end of each day.
- Portafilter and Basket: Remove the portafilter basket and clean it thoroughly. Rinse the portafilter itself and wipe down the group head with a clean, damp cloth.
- Steam Wand: After each use, purge the steam wand by letting out a small amount of steam and wiping it down with a damp cloth to prevent milk residue build-up.
- Weekly Cleaning:
- Deep Backflushing: Use a dedicated espresso machine cleaner or detergent for a more thorough backflush. Follow the instructions on the cleaner for the right amount to use.
- Drip Tray and Water Reservoir: Remove and clean these components with warm, soapy water to prevent any build-up of coffee oils and mineral deposits.
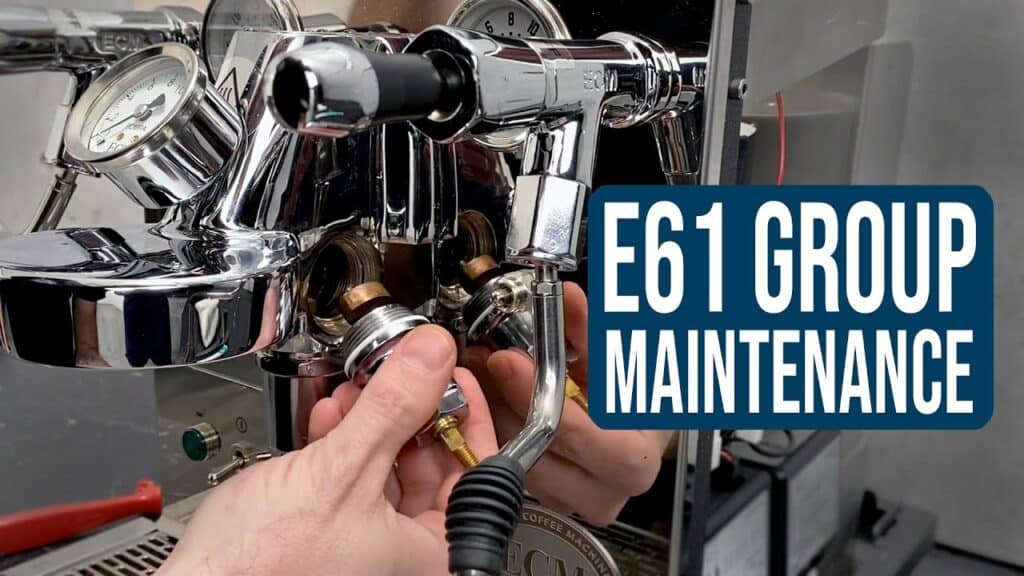
Descaling and Inspecting Gaskets and Seals:
- Descaling:
- Frequency: Depending on your water hardness and usage, descale your machine every 3-6 months. Use a descaling solution recommended by your machine’s manufacturer.
- Process: Follow the manufacturer’s instructions for descaling. Typically, this involves running the solution through the water reservoir and the group head, followed by several flushes with clean water to remove any residue.
- Inspecting Gaskets and Seals:
- Group Head Gasket: Regularly inspect the group head gasket for signs of wear and tear. If you notice leaks or if the portafilter doesn’t lock in as securely, it might be time to replace the gasket.
- Steam Wand Seals: Check the steam wand seals to ensure they’re not leaking. Replace them if you notice any issues with steam pressure or leaks.
Tips and Troubleshooting
Consistency is key to achieving a perfect espresso shot every time. The grind size and tamp pressure play pivotal roles in the extraction process.
- Grind Size: Ensure your coffee grounds are consistently fine. Any variation can lead to uneven extraction, affecting the flavor. Using a high-quality burr grinder can help maintain consistency.
- Tamp Pressure: Aim for a consistent tamp pressure of about 30 pounds. Uneven tamping can cause channeling, where water finds paths of least resistance through the coffee, leading to under-extraction. Practice maintaining the same pressure and technique for every shot.
Using a Thermometer to Monitor Temperature:
Monitoring the temperature of your water and milk (if making a milk-based espresso drink) can significantly impact the quality of your espresso. The ideal brewing temperature is between 195°F and 205°F. Use a thermometer to ensure your machine is within this range. For milk, aim for around 150°F for optimal texture and sweetness without scalding.
Troubleshooting Common Issues
Addressing Bitter or Sour Espresso:
- Bitter Espresso: If your espresso tastes bitter, it’s likely over-extracted. To fix this:
- Grind Size: Adjust to a coarser grind.
- Extraction Time: Reduce the extraction time slightly.
- Water Temperature: Ensure the water temperature is not too high.
- Sour Espresso: If your espresso tastes sour, it’s likely under-extracted. To correct this:
- Grind Size: Adjust to a finer grind.
- Extraction Time: Increase the extraction time slightly.
- Water Temperature: Ensure the water temperature is within the ideal range.
Tips for Dealing with Channeling:
Channeling occurs when water finds weak spots in the coffee puck, leading to uneven extraction. To prevent this:
- Proper Distribution: Ensure the coffee grounds are evenly distributed in the portafilter before tamping.
- Even Tamping: Apply consistent and even pressure while tamping.
- Check for Clumps: Break up any clumps in the coffee grounds to avoid uneven density.
Conclusion
Recap:
Brewing espresso with the E61 group head is an art that involves understanding its history and design, preparing your equipment, mastering the brewing process, and maintaining consistency. The key steps include:
- Properly warming up the machine and purging the group head.
- Selecting the right grind size and using consistent dosing and tamping techniques.
- Monitoring and adjusting the extraction process for optimal results.
- Serving the espresso immediately in a pre-warmed cup.
- Regular cleaning and maintenance to keep your equipment in top condition.
Encouragement:
Remember, mastering espresso brewing is a journey. Each shot you pull is an opportunity to learn and refine your technique. Don’t be afraid to experiment with different variables and enjoy the process of creating your perfect espresso. Happy brewing!
Disclosure: Our blog contains affiliate links to products. We may receive a commission for purchases made through these links. However, this does not impact our reviews and comparisons. We try our best to keep things fair and balanced, in order to help you make the best choice for you.